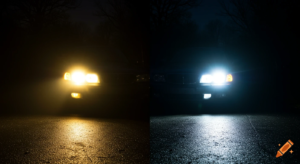
Over time, almost every car driver notices a troubling change: once-clear headlight lenses begin to look cloudy, hazy, or distinctly yellowed. Beyond ruining the front-end aesthetics of your vehicle, foggy headlights are a major safety hazard. Dull lenses scatter the light beam produced by your bulbs, reducing night visibility by up to 70–80%.
Replacing the entire headlight assembly can easily cost hundreds of dollars per side. Fortunately, you can restore oxidized headlight lenses right in your own driveway using simple tools and techniques. In this step-by-step guide, we will explore why headlights yellow over time and walk you through the ultimate DIY restoration process to bring back crystal-clear clarity.
Why Do Car Headlight Lenses Turn Yellow and Foggy?
Modern vehicle headlights are made from polycarbonate plastic, a lightweight, shatter-resistant material that withstands road debris far better than glass. However, polycarbonate plastic has a major vulnerability: Ultraviolet (UV) radiation.
[UV Rays & Oxygen] + [Polycarbonate Plastic] ──> [Oxidized Layer] ──> [Yellow/Foggy Lens]
- UV Degradation: Manufacturers apply a thin protective layer of UV-resistant clear coat over factory headlights. Over years of exposure to sunlight, heat, and weather, this factory coating degrades and breaks down.
- Polycarbonate Oxidation: Once the protective layer wears away, exposed polycarbonate reacts with atmospheric oxygen, creating microscopic cracks and a yellowed, opaque oxidation layer.
- Road Debris Micro-Pitting: Sand, gravel, dirt, and harsh chemicals pitted into the lens surface during daily driving accelerate oxidation buildup.
What You Need for DIY Headlight Restoration
Before starting, gather the following materials:
- Painter’s Masking Tape: To protect the surrounding body paint and trim.
- Wet/Dry Sandpaper: 1000-grit, 2000-grit, and 3000-grit.
- Rubbing Compound / Automotive Polish: High-cut polish for plastics.
- Microfiber Towels: For wiping and buffing.
- Spray Bottle filled with Water & Dish Soap: For wet sanding lubrication.
- UV-Resistant Clear Coat or Ceramic Coating: Essential for long-term protection.
- Isopropyl Alcohol: For deep cleaning before sealing.
Step-by-Step Restoration Guide
Step 1: Clean and Mask the Surrounding Area
Thoroughly wash the headlight lenses with soapy water to remove surface dirt, bugs, and grease. Dry the area completely. Next, apply painter’s masking tape carefully around the entire border of the headlight housing to protect your car’s paint job from accidental sandpaper scratches.
Step 2: Wet Sanding to Remove Oxidation
Sanding physically strips away the dead, yellowed layer of plastic. Always keep the surface thoroughly lubricated during sanding.
- 1000-Grit Sandpaper: Wet the lens and the sandpaper generously with your soapy water spray. Sand horizontally in straight, steady motions back and forth across the lens until the heavy yellowing and flaking coat are removed.
- 2000-Grit Sandpaper: Spray fresh water and switch to 2000-grit. Sand vertically (opposite direction of the previous step) to smooth out the scratches created by the 1000-grit paper.
- 3000-Grit Sandpaper: Finish with 3000-grit wet sanding in horizontal motions. At this stage, the lens should appear uniformly hazy, smooth, and completely free of yellow patches.
Important: Never dry sand polycarbonate plastic! Always keep the surface dripping wet during the process.
Step 3: Polish to Restore Clarity
Now that the oxidized layer is removed, polishing eliminates fine sanding scratches and restores optical transparency.
- Apply a quarter-sized drop of plastic polishing compound or heavy-cut rubbing compound onto a clean microfiber towel or foam buffing pad.
- Work the compound vigorously in circular motions across the lens for 3 to 5 minutes, applying moderate pressure.
- Wipe off compound residue with a clean microfiber towel. You will immediately see the foggy lens transform into crystal-clear plastic.
Step 4: Apply a UV Sealant (Crucial Step!)
If you stop after polishing, your headlights will oxidize and turn yellow again within a few months because the raw plastic has no defense against sunlight.
To permanently preserve your work:
- Wipe the restored lens with isopropyl alcohol to remove oily residues from the polish.
- Apply a generous layer of UV-resistant clear coat spray or a dedicated ceramic headlight sealant.
- Allow the clear coat or ceramic protection to cure undisturbed away from dust and moisture according to product instructions.
Quick Home Fixes vs. Professional Restoration
| Method | Effectiveness | Durability | Best Used For |
| Toothpaste / Baking Soda | Very Low | Days to Weeks | Quick temporary fix for photos or immediate driving |
| DIY Wet Sanding & UV Sealant | High | 1 to 3 Years | Long-lasting budget DIY restoration |
| Full Headlight Replacement | Maximum | 5+ Years | Severely cracked, broken, or internally damaged lenses |
Conclusion
Restoring oxidized headlight lenses is an affordable and rewarding DIY task that improves both vehicle appearance and night driving safety. By systematically sanding away oxidation, polishing the plastic, and applying a robust UV protective layer, you can restore full light output and ensure maximum visibility on dark roads.